jeudi 4 octobre 2012
mardi 24 avril 2012
Raw Vegan Key Lime Pies
 Hello everyone!
We promised we'd share this YUMMY recipe with you guys...so here it is!
These raw key lime pies we're created in a few minutes! We took a few ideas here and there of other peoples recipes and we created our own. We we're out of limes, but that didn't stop us...we used lemons! worked wonderfully. Oh! And some people might wonder what made the filling green. Well, we used avocados! Avocados are very versatile and work very well in main dishes, dips and even desserts! Did you know avocados are a fruit and are part the berry family?! So this is a once-again, super easy-to-do recipe and way healthier than your common key lime pie! No need to feel bad when indulging yourself with these little treats!

Here are the ingredients for the crust:
- 3/4 cup nuts (we mixed: bresil, almonds and walnuts)
- 1 cup shredded unsweetened (raw) coconut
- 2 tablespoons datte purée
- 1/2 teaspoon vanilla extract (alcohol free, or vanilla bean powder)
- dash of salt


Put the nuts in food processor and grind them until you get a small crumble texture. You don't want it to be a 'flour'. Add the coconut, salt and vanilla extract in the food processor. Mix for until combined. Put your mixture in a bowl and add the date purée. Mix with your hands. Take out a cupcake mold and add a bit of coconut oil in the bottom, so it will be easier to remove the pies. You can use a brush or your fingers and just put a thin layer. You can now add the crust into each little mold. Press down and cover the sides of the molds.
Now, for the filling, you will need;
- 1 1/2 avocado
- 1/4 cup coconut oil
- 1/2 cup of coconut butter (is a bit like coconut oil, but is made with the white inside part of the coconut).
-1/2 cup agave nectar
- 1/2-3/4 cup pressed lemon juice

On vous Aime!
F&A :)


(fay and Djan)

jeudi 19 avril 2012
Buckwheat Pasta with Creamy Avocado Sauce
Here's a SUPER easy-to-do sauce for any kind of pasta. It can even be eaten as is, with carrots or sliced cucumbers, for example. My boyfriend, Djan (Audrey's) wanted to try a new kind of pasta, so I bought him some buckwheat Soba noodles. He felt like your average white pasta was becoming harder to digest and was a 'heavy' meal. So, this is how I came up with the idea of using a pasta made of buckwheat, which contains no gluten (a protein found in wheat, which is hard to digest). The sauce was a no-brainer, as it consists of no cooking!! Yay! I could eat it raw with my own salad or veggies! When I told Djan there was no cooking involved, he was like: 'What? It won't be warm? How is it gonna taste?'. I told him to trust me and taste it. He said it was a winner. ;)

Here are the ingredients for the sauce; all you have to do is put all the ingredients in a food processor. Literally takes 2 minutes. Who ever said being vegan was hard and not tasty, hasn't tried this!

- 1 medium sized ripe Avocado, pitted
- 1/2 lemon, juiced with some lemon zest to garnish
- 1-2 cloves of garlic
- 1/4 tsp. salt (himalayan or celtic sea salt)
- Freshly ground black pepper, to taste
- 6 big leaves of fresh Basil.
- 2 tbsp extra virgin olive oil
- Your choice of pasta ( I used Soba's Buckwheat pasta)
Once you take the pasta out of the water, just strain and add a bit of olive oil so they won't stick together. Add the sauce to your pasta, which is still warm from cooking. Leftovers are good eaten cold; as a pasta salad! Enjoy, and let us know how yours turned out! 
 Much Love to all!
F&A :) xxx
*Gluten free recipe.
mardi 3 avril 2012
Vegan baked vanilla Cupcakes with Raw raspberry icing!
Vegan baked vanilla Cupcakes with Raw raspberry icing!

Here is the recipe for the cupcakes:
1 cup almond milk, or soy milk
1 tsp apple cider vinegar
1 1/4 cups all purpose unbleached flour
1 tsp baking powder
1 tsp baking soda
dash of salt
1 cup vegan butter or margarine
3/4 raw cane sugar
2 tsp. vanilla extract
- Preheat oven to 350 degrees. Line muffin pan with cupcake liners.
- Whisk the almond milk and vinegar in a bowl and set aside for a few minutes to get good and curdled.
- Sift the flour, baking powder, baking soda, and salt into a large bowl and mix.
- In a separate large bowl, use a handheld mixer at medium speed to cream the margarine and sugar for about 2 minutes until light and fluffy. (Don’t beat past 2 minutes and if you don't have an electric mixer, use a whisk and make sure the butter is soft before mixing.) Beat in the vanilla, then alternate beating in the almond milk mixture and dry ingredients, stopping to scrape the sides of the bowl a few times.
- Fill cupcake liners two-thirds of the way and bake for 15 to 20 minutes. Transfer to a cooling rack, and let cool completely before frosting.
Icing:
1/2 cup frozen raspberries, leave on the counter for a few min to let them unfreeze.
1/4 cup extra virgin coconut oil, softened
1 1/2 tb spoon. agave nectar
1/4 cup raw cashews
1/4 cup filtered water, or more, depends how soft you want the icing
Put all of these ingredients in a blender, and mix well. Be sure that your raspberries are room temperature before mixing in the coconut oil, as the oil might get into clumps and won't give a smooth texture. Spread onto cooled cupcakes. If you let the icing in the fridge for a few minutes, it will solidify a bit and will be easier to spread.
* These will keep for a few days if kept in a container in the fridge. :)
Much Love
F&A
XOXO
vendredi 30 mars 2012
Onion Crumble and Veggie Collard Wraps
Collard Wraps with Cilantro and Ginger Dipping Sauce
.jpg) Hello rays of sun!
Hello rays of sun!
Today, the sun was out, and we felt like going on the rooftop to eat lunch. Fay made an amazing dehydrated "onion bread" last night. The smell of it this morning gave us the idea to use the collards we had in the fridge and combine these with the bread, to make a delicious meal!
Here's what' inside the wrap;
- Handful of onion bread we crumbled with our hands (recipe below)
- lettuce
- tomato, cut into sticks
- beets, sliced into juliennes
- lentil sprouts
Here are the ingredients for the Onion bread;
- 2 white onions (sweet)
- 1/4 cup olive oil
- 1 cup ground sunflower seeds (can be sprouted and wet, that's how we did it)
- 1 cup ground golden flax seeds
- 1/4 cup Nama Shoyu
 In food processor, finely chop the onions. Careful not to mash completely, and then set aside. Do the same thing with your flax seeds and sunflower seeds. Put all these ingredients and others into a bowl, and mix well. You can use your hands, I feel like you can put even more Love into it. ;)
Spread onto a dehydrator sheet with a teflex paper or parchment works as well. Set the dehydrator to 105 degrees, for the night. At least 7 hours. Depending on how thick you spread the mixture, it will take a longer time to dehydrate.
You can either enjoy as is, using it as a bread, or make a crumble with it, as we did, to incorporate in wraps or sprinkle onto salads and soups. We thought the taste was a bit intense to use for a full sandwich, this is why we decided to incorporate it this way!
Almost forgot about the sauce! While Fay was making the wraps, I whipped up a sauce for us to dip them in. Literally took me two minutes.
- 1 tablespoon nama shoyu
- 1 tablespoon apple cider vinegar
- 1 tablespoon filtered water
- 1/2 tablespoon olive oil
- 1 teaspoon freshly grated ginger
- about 1/4 cup of freshly chopped cilantro
Put all of the ingredients in a small food processor, or in a blender. You can also simply mix by hand.
Serve this wonderful sauce on the side, for the wraps to be dipped in.
This was a really fresh and at the same time filling lunch!
.jpg)
Love to all!
F&A
xoxo photos by: Fay Sckoropad
.jpg)
Today, the sun was out, and we felt like going on the rooftop to eat lunch. Fay made an amazing dehydrated "onion bread" last night. The smell of it this morning gave us the idea to use the collards we had in the fridge and combine these with the bread, to make a delicious meal!
Here's what' inside the wrap;
- Handful of onion bread we crumbled with our hands (recipe below)
- lettuce
- tomato, cut into sticks
- beets, sliced into juliennes
- lentil sprouts
Here are the ingredients for the Onion bread;
- 2 white onions (sweet)
- 1/4 cup olive oil
- 1 cup ground sunflower seeds (can be sprouted and wet, that's how we did it)
- 1 cup ground golden flax seeds
- 1/4 cup Nama Shoyu
 In food processor, finely chop the onions. Careful not to mash completely, and then set aside. Do the same thing with your flax seeds and sunflower seeds. Put all these ingredients and others into a bowl, and mix well. You can use your hands, I feel like you can put even more Love into it. ;)
Spread onto a dehydrator sheet with a teflex paper or parchment works as well. Set the dehydrator to 105 degrees, for the night. At least 7 hours. Depending on how thick you spread the mixture, it will take a longer time to dehydrate.
You can either enjoy as is, using it as a bread, or make a crumble with it, as we did, to incorporate in wraps or sprinkle onto salads and soups. We thought the taste was a bit intense to use for a full sandwich, this is why we decided to incorporate it this way!
Almost forgot about the sauce! While Fay was making the wraps, I whipped up a sauce for us to dip them in. Literally took me two minutes.
- 1 tablespoon nama shoyu
- 1 tablespoon apple cider vinegar
- 1 tablespoon filtered water
- 1/2 tablespoon olive oil
- 1 teaspoon freshly grated ginger
- about 1/4 cup of freshly chopped cilantro
Put all of the ingredients in a small food processor, or in a blender. You can also simply mix by hand.
Serve this wonderful sauce on the side, for the wraps to be dipped in.
This was a really fresh and at the same time filling lunch!
.jpg)
Love to all!
F&A
xoxo photos by: Fay Sckoropad
jeudi 29 mars 2012
Living Granola!
Hey everyone!
It's been a while since Fay and I wrote on our blog, we thought today would be a good idea to get back to it! Since we came back from our trip to Cali, we have been very busy.. new projects, moving and so that's the reason for the delay.
Today I want to share with all of you the recipe of my Living Granola. I put together some things I had in my pantry... spouted buckwheat, mulberries and raw cacao! SOOOO GOOD!
So here are the ingredients:
 - 2 cups of raw shredded coconut
- 1 1/2 cup of date puree (dates soaked in water, then puréed in blender)
- 1/2 cup of dried mulberries (or any dried fruits)
- 1/4 cup of raw cacao
- 1 cup of sprouted sunflower seeds (may be humid)
- 1 1/2 of sprouted buckwheat (may also be humid, if you just sprouted them)
- 1/4 raw cacao nibs
Put all ingredients in a bowl, mix well. Spread onto a sheet of your dehydrator. If you do not have a dehydrator, you may eat it as well. But it will not keep for as long. If dehydrating, set it to 95 degrees for a couple of hours. About 5-6 hours. Enjoy with your favorite milk! Of course, you know us, we ate it with our freshly made almond milk! Breakfast for Champions!
On vous aime!
F&A
xoox
dimanche 4 mars 2012
Smoothie au lait d'amande et petits fruits!
Smoothie au lait d'amande et petits fruits!
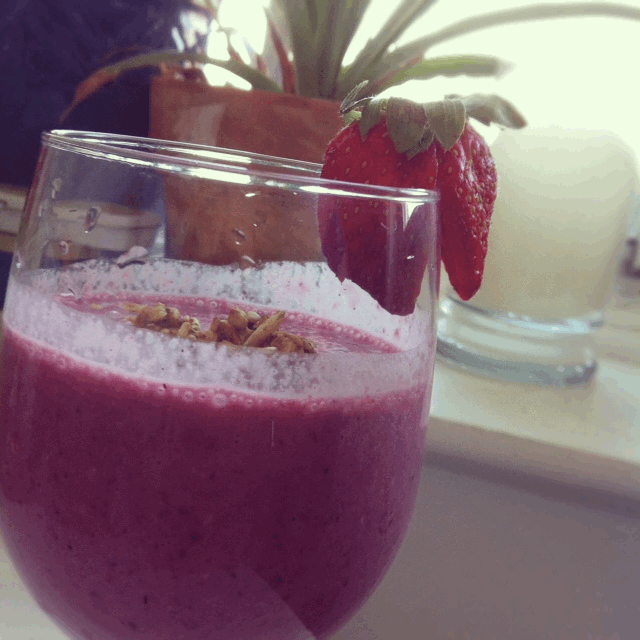
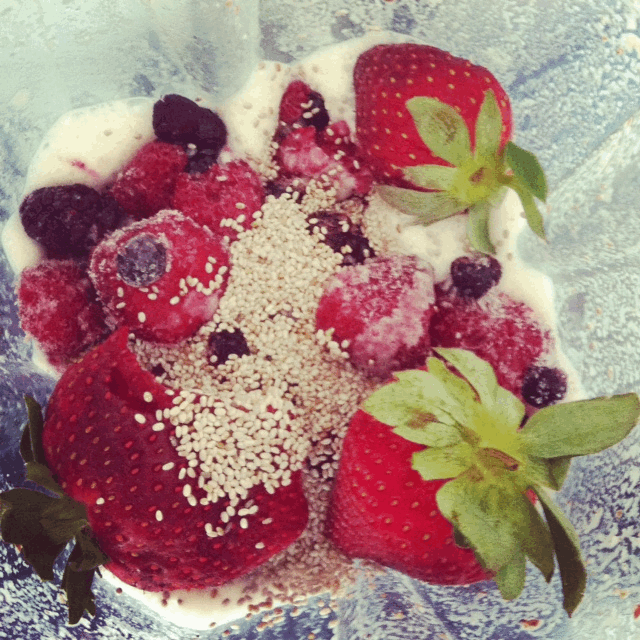
- 1 1/2 t. de lait d'amande (recette plus loin dans le blog)
- 1 banane bien mûre
- 1 1/2 de petits fruits congelés (fraises, bleuets, framboises)
- 3 fraises fraîches avec ou sans feuille
- 1 pomme moyenne, épluchée et coupée en dés
- 1/4 de t. de noix de coco rapé (voir image plus bas)
- 1 cuil. à thé de lucuma en poudre
- 1 cuil. à table de graines de chia
- une cuillière de votre granola favori! (notre recette va suivre bientôt...nous attendons seulement que notre sarrazin germe pour pouvoir le déshydrater avce nos autres fruits et noix!)
-une fraise coupée en petits dés (déposer avec le granola)
 Mettre tous les ingrédients du haut dans un mélangeur, jusqu'à l'obtention d'un mélange uniforme et lisse.
 Sur le dessus de mon smoothie, j'ai déposé un peu de granola fait de sarrazin germé et déshydraté, graines de tournesol, carottes rapées, maca en poudre, noix de grenoble. Vu que ce smoothie est très 'crémeux', en y ajoutant un peu de granola et une fraise coupée, c'ets comme si on mangeait du yogourt. ;)


Lucuma: La lucuma (Pouteria lucuma) autrefois connu sous le nom "l'or des Incas" est le fruit d'un arbre à feuilles persistantes des zones tropicales d'Amérique du Sud de la famille des Sapotaceae. Cet arbre pousse principalement au Pérou à plus de 1000 m d'altitude. La lucuma a une valeur nutritive élevée. C'est une bonne source d'hydrates de carbone, de vitamines (bêta-carotène, B3), de sels minéraux (fer, calcium) et de fibres alimentaires.
Elle contient différents types de sucres : dans 100 g de chair séchée, vous aurez 8,4 g de glucose, 4,7 g de fructose, 1,7 g de saccharose et 0,06 g d'inositol.
Malgré un goût sucré prononcé, son index glycémique est faible.
(vous pouvez vous en procurez dans les épiceries santé ou chez crudessence.) www.crudessence.com
Enjoy!
F&A
xox
Inscription à :
Commentaires (Atom)